


Jordan Yin’s Umbral Aura Guide
Last Modified: June 10, 2021
Absorption
No cost auto-power that increases your energy and negative energy resistance. Energy attacks include radiation, darkness powers, lasers, electricity, etc. Common enemy types that use these include council, shivans, and clocks
 | Minimum Slotting |  |  |
Gravity Shield
Increases resistance to lethal and smashing. This includes bullets, bats, rocks, punches, or anything else that's a form of physical damage. Since this is by far the most common form of damage in the game, this shield is the most useful.
| Minimum Slotting | | |
| Unslotted Damage Resistance | | 25% Reduction of Smashing/Lethal | |
I still can't decide if I should drop this shield for Ebon Eye in a respec. In the early levels, it's great, but once you have your dwarf, it becomes kind of pointless.
Orbiting Death

Provides a large aoe attack around you. It's a bit slow and draws a lot of aggro, but would probably be useful if you spend a lot of time fighting up close in human form. It also has uses for preventing attacks from Stalkers in pvp, but it does a very tiny amount of damage per click and works slowly so it's not very exciting other than looking very cool.
There is one important use for this however. If you knock an enemy into the wall, this can be used to damage him when nothing else will. | Minimum Slotting | | |
| Unslotted Strength | | 38% of Brawl | |
Note that it's so good at drawing aggro, that it's sometimes called orbiting debt
Penumbral Shield

Increases resistance to fire, cold, and toxic damage. This includes zombie puke, demon fire, and… uh… not much uses cold. It's there now and then, but very, very rare. For the most part, just a few council and crey use it. The toxic protection is good in low levels where you fight vhaz, but the fire will serve you well throughout the game.
| Minimum Slotting | | |
| Unslotted Damage Resistance | | 23% Reduction of Fire/Cold/Toxic | |
I have never taken this power because I don't spend much time in human form. Use of it or not depends a lot on your playstyle.
Shadow Cloak

Like Stealth from the Invisibility Pool, but with some extra benefits. Makes you harder to see and stacks with Super Speed to give you full invisibility without the annoying side-effect of a movement penalty or not being able to launch attacks while invisible. Gives bonus to defense and perception
| Minimum Slotting | | |
You could take the Stealth power instead which still provides full invisibility with Super Speed, but there are several reasons not to do so. The defense is higher than Stealth, there's no movement penalty, you have a perception bonus, and the endurance cost is lower by default.
Twilight Shield

Increases resistance to energy and negative energy. Same as Absorption, but stronger. Turn it on when you need it, but note that many more enemies use energy attacks than fire, cold, or toxic (especially since you will always find yourself facing other Kheldians and a large amount of council in your missions as a Kheldian). If you had to choose, chances are this shield will serve you better than Prenumbral Shield.
| Minimum Slotting | | |
| Unslotted Damage Resistance | | 24% Reduction of Energy/Negative Energy | |
Black Dwarf

Right on! It's your tank form. Not only do you get a bunch of new powers automatically, you have extremely high resistance to all damage (except psionics) and any type of hold, slow, or knockback. You would have to run all three of the other shields to equal this and for this reason, I go mostly shieldless and just switch to dwarf for defense.
Note that while the Dwarf form also has a bonus to endurance regeneration, there's little point in slotting it unless you plan to fight in Dwarf form a lot.
| Minimum Slotting | | |
Black Dwarf Strike
Medium damage, but slow to recharge. Might knock down an opponent (as opposed to knockback).
| Minimum Slotting | | |
| Unslotted Strength | | 234% of Brawl | |
Black Dwarf Smite

Stronger and adds possible disorient or dropping flyers on top of what Strike does. Still better than most human form attacks, but still fairly slow.
| Minimum Slotting | | |
| Unslotted Strength | | 355% of Brawl | |
Black Dwarf Drain

Let's you suck some life from an enemy. You must target a living enemy to use it, and if it hits, it will damage them and heal you.
| Minimum Slotting | | |
| Unslotted Strength | | 253% of Brawl | |
You'll want two accuracy and maybe a heal as the Dwarf is your "oh carp!" form where you are probably on your way to dying and opt for this form for protection. You'll want to heal yourself up, but that doesn't happen if you miss and Dwarf powers recharge very slowly.
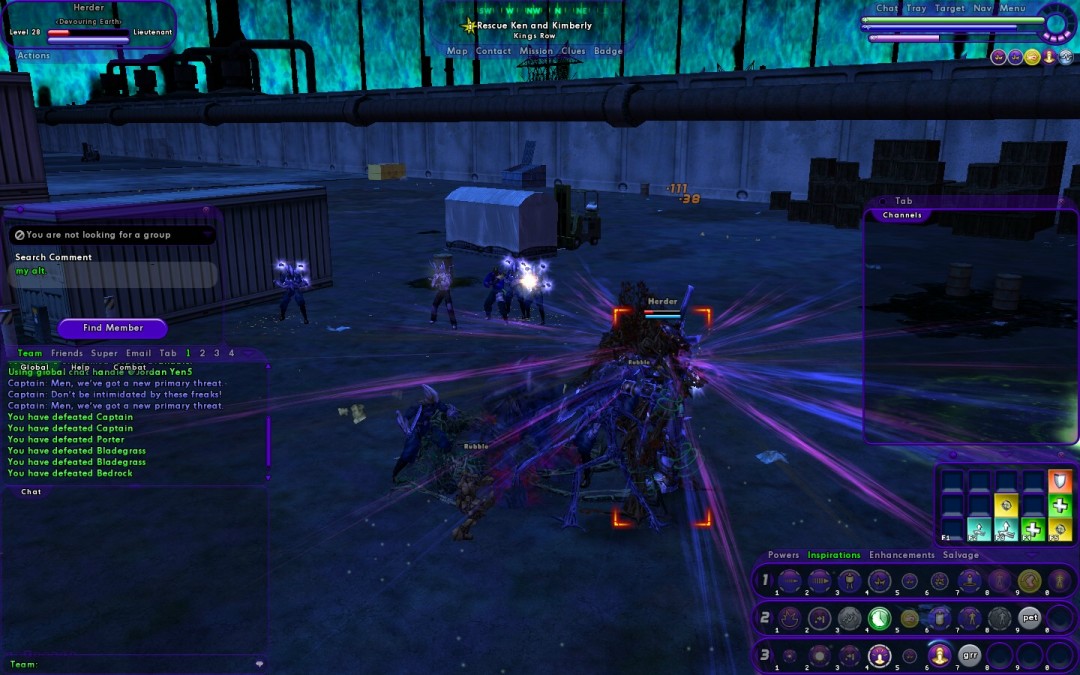
Black Dwarf Mire

Same as Sunless Mire. Damages all foes in an area around you and gives you damage and accuracy for each one hit. Using this and then Sunless Mire is known as “double mire" and can give you ridiculous damage potential.
In the picture, you can see a double mire in action. Note that the damage and radius of the Dwarf Mire is much higher and larger than the human version.
| Minimum Slotting | | |
| Unslotted Strength | | 253% of Brawl | |
You don't want this to miss. If you use the Dwarf Mire second, you can probably drop one of the accuracy since Sunless Mire will increase your accuracy anyway.
Black Dwarf Step

It teleport again. Useful for your tank form because it moves so slowly. Teleport is a great way to start a battle by just popping right into the middle of an enemy group. It's also great to escape immobilization
/bind ctrl+lbutton powexec_name Black Dwarf Step"
This bind lets you teleport in any direction with a simple point and click (while holding CTRL). Since it uses lbutton" in the bind, it activates without using the target which can be useful in battle (as opposed to the shift bind I suggested before for your travel teleport which DOES give you a target).
| Minimum Slotting | | |
Black Dwarf Antagonize

A taunt power that works on a target and surrounding enemies. If you are tanking for your team, this will help you control aggro. You can see in the picture which enemies are affected by the white lines around their head. That's the "I'm pissed at you" animation.
| Minimum Slotting | | |
Stygian Circle

This might be the best power a Warshade has, if not the best power ever created. Ok, I might be exaggerating, but it's great. For this power alone, you don't need either health or stamina. Just stand near some defeated enemies and activate it to suck the energy from their cold, lifeless (I mean arrested) bodies. With one endurance Modification enhancement, you'll get about half a bar of endurance for one enemy and nearly full health and end for two.
The only problem you'll have is when fighting avs because it takes so long to take them down that you won't be able to use Stygian Circle to replenish yourself. For that, you should fight mostly in Nova form which has a bonus to endurance recovery and has the strongest attacks anyway.
| Minimum Slotting | | |
| Heal Strength | | 20% of Your Life Total for One Enemy Drained | |
Hmm… I need to do some more testing to see how the percentage changes with one or more than one enemy at a time.
Nebulous Form

Basically the same as Phase Shift from the invisibility power pool. You become intangible (not invisible) and can't affect or be affected by anything else. For the most part this will only let you run to a safe spot since practically every ws power affects others. It has a long activation time (a few seconds) which makes it not as good as an escape power, but it does have its uses.
For example, it's a great way to absorb the alpha strike of a group of enemies. Walk into the middle of a large group, let them hit you (which doesn't hit) and then drop Nebulous Form to launch your combos before they fire again (which works very well since ws secondary effect on all powers is slow).
Now that they've adjusted the way aggro works to prevent herding, you can use NF to run through a mission right to the end and only have to worry about a few enemies who might have followed you the whole way. Used with Shadow Cloak, you might not aggro much in the first place.

If you do end up running from a battle nearly dead and find you went the wrong way and you're cornered. You will often have time to launch NF and use it to get away.
Keep in mind two very important things: One is that it uses a lot of endurance. The other is that it only lasts 60 seconds no matter how much endurance you have.
| Minimum Slotting | | |
When you use this power, the important thing is to make sure that when you turn it off (or it wears off), that you're not drained of endurance unless you're somewhere safe.
Lastly, while using this power, you have the ability to jump extremely high. For this reason, it can double as a kind of travel power if you launch it while crossing a zone. Not only are you invincible to attack, but you can make it to your location faster by jumping over walls you might not be able to.
Inky Aspect

Damages you every second or so, but keeps enemies around you disoriented. I've been told many times that the Health power from the fitness pool completely counteracts the life drain and with two Heal enhancements, you'll still gain life with it on.
Either way, as a tri-form, I've found it basically worthless unless you spend time in human form. If you want to be in melee range or need a control power to prevent damage, this will help. Note that it works well with voids as well and in pvp.
| Minimum Slotting | | |
Stygian Return

A self rez the effectiveness of which depends on how many enemies are still alive near you. Using this power is not as dangerous as it once was with 30 seconds of debt protection after rezzing in missions (as of issue 6 I believe).
Think of how fun this power can be. Let's say you're dead and your team has run with the enemies following close behind. Eventually, the enemies return to the room they were in. As the last guy walks by, you activate the power and start going postal  .
.
| Minimum Slotting | | |
| Unslotted Strength | | 283% of Brawl | |
| Heal Strength | | 26% of Your Life Total for One Enemy Drained | |
Fortunately, the times you die will often be because of something that followed you or a group that overwhelms you giving you plenty opportunity to use this. The damage it deals is decent and the life and endurance gains are very good.
Eclipse
As a Warshade, you can pull some of the coolest combos in the game… if you live long enough. Enter Eclipse. It sucks endurance from enemies in a pbaoe around you and raises yours, but that's not it's primary use. It also increases your damage resistance to all but psionics for each enemy hit!
Using this buys you time to use your other powers and blow the roof off. You should take this power, take it as early as you can, and slot it up as fast as possible.
| Minimum Slotting | | |
According to my character builder, this slotting will bring Eclipse back every 60 seconds. Faster with Hasten (which I have too). This is fast enough to use every battle or every other battle.


